Mastering the Basics: A Step-by-Step Guide to Assembling Infusion Systems Safely and Efficiently

In medical settings, the proper assembly and operation of infusion systems is critical for patient safety and treatment success. Whether delivering fluids, medications, or nutrients intravenously, infusion systems serve as lifelines—quite literally. For healthcare professionals, mastering the assembly process ensures not only the integrity of the treatment but also minimizes the risk of infection, air embolisms, and medication errors.
This step-by-step guide is designed to help nurses, technicians, and caregivers assemble infusion systems safely and efficiently, covering essential tools, techniques, and best practices.
Understanding the Components of an Infusion System
Before diving into the assembly steps, it's important to understand the key components of a typical infusion system:
IV Bag or Bottle – Contains the prescribed fluid or medication.
IV Tubing Set – Includes a drip chamber, flow regulator (roller clamp or dial), injection ports, and connectors.
Infusion Pump (if used) – Controls the rate and amount of fluid delivered.
Catheter or Cannula – Inserted into the patient’s vein to administer the fluid.
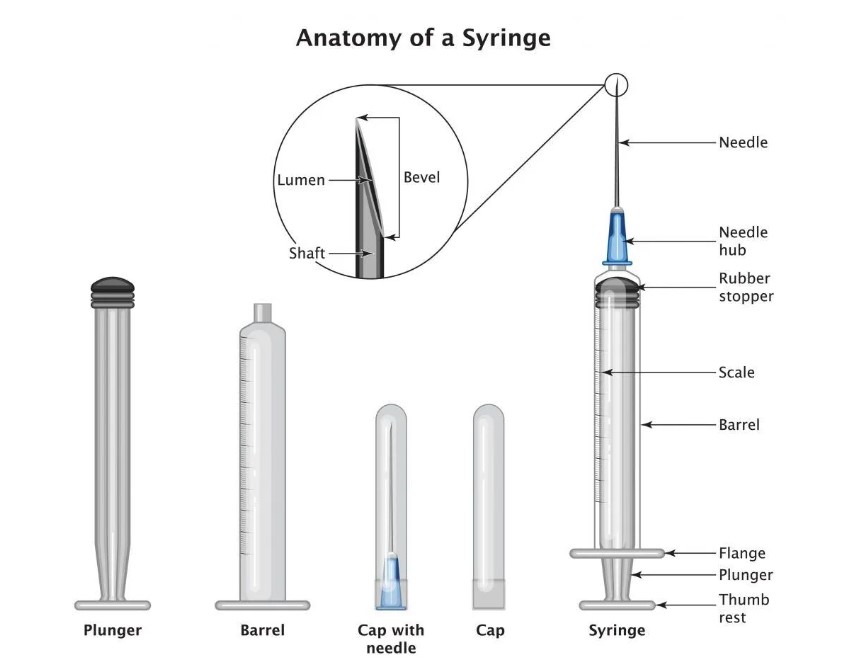
Needles and Syringes – Used for drug admixtures or flushing the line.
Each component must be handled with care to maintain sterility and functionality.
Step 1: Prepare a Clean Workspace
The first and most vital step is to ensure a sterile and organized environment. Wash your hands thoroughly and wear gloves. Disinfect the workspace with appropriate cleaning agents to minimize the risk of contamination.
Pro Tip:
Use a designated procedure tray or cart to keep all your tools and supplies within reach but separate from potential contaminants.
Step 2: Verify the Prescription and Supplies
Double-check the doctor's order or prescription. Confirm:
The correct fluid type and volume
Medication additives (if any)
Flow rate or infusion time
Gather all necessary equipment, including the IV fluid, tubing set, connectors, and pump if required. Inspect for expiration dates and damage—do not use items with compromised packaging.
Step 3: Spike the IV Bag
Hang the IV bag on a stand or pole.
Remove the protective cap from the IV bag port.
Remove the spike cap from the tubing set without touching the spike tip.
Insert the spike into the IV bag port using a twisting motion to maintain a sterile connection.
Do not touch the spike or the port’s internal surfaces.
Step 4: Fill the Drip Chamber and Prime the Line
Squeeze the drip chamber until it’s half full.
Open the roller clamp to allow fluid to flow through the tubing.
Hold the end of the tubing over a sink or waste container to catch the expelled air and fluid.
Watch for air bubbles and ensure the line is fully primed before closing the clamp.
Pro Tip:
Prime slowly to avoid creating bubbles. Some modern tubing sets come with a backcheck valve to make this easier.
Step 5: Connect to the Patient or Extension Set
Ensure the patient’s IV access site is flushed and patent. Clean the catheter hub or port with an alcohol swab or chlorhexidine wipe for 15–30 seconds, and let it dry completely.
Remove the protective cap from the primed tubing.
Connect the tubing to the catheter or extension set using a luer-lock connection.
Tighten securely to avoid leakage or disconnection.
Step 6: Adjust the Flow Rate or Set Up the Infusion Pump
If using gravity flow:
Use the roller clamp or dial flow regulator to adjust the drip rate.
Count drops per minute using a timer to match the prescribed rate.
If using an infusion pump:
Program the correct rate and volume.
Confirm that all air is purged before starting the infusion.
Monitor for occlusions or alarms.
Pro Tip:
Always double-check pump settings before initiating the infusion, especially with high-alert medications.
Step 7: Monitor and Document
Once the infusion is started:
Monitor the site for signs of infiltration, phlebitis, or infection.
Check for proper flow and observe the patient for any adverse reactions.
Document start time, fluid type, flow rate, and any observations in the patient’s chart.
Regular assessments ensure timely interventions and improve patient safety.
Safety Tips for Efficient Infusion Assembly
Standardize procedures across staff to reduce errors.
Label all lines and medications clearly, especially when administering multiple infusions.
Avoid distractions during assembly and connection.
Never reuse disposable components, even if they appear clean.
Educate and refresh training periodically to keep up with evolving best practices.
Conclusion
Assembling infusion systems might seem routine, but it’s a task that requires precision, attention to detail, and a commitment to patient safety. Mastering the basics—sterile technique, proper component handling, correct flow rate setup, and vigilant monitoring—ensures optimal outcomes and prevents costly mistakes. With a methodical approach, healthcare professionals can carry out infusions confidently, delivering care that is both safe and effective.
In healthcare, excellence lies in the details. And when it comes to infusion systems, those details save lives.


Comments
Post a Comment